Showing posts with label Solids. Show all posts

Wednesday, October 22, 2014

MODA Modern Building Blocks - Week 4 - Triangle Paper Cheats!

Now that I got your attention! :-) 

So I am on my way to Quilt Market - but I couldn't forget about our blocks! 

In class, we talked about how the center of Block #1, Block #12 and Block #18 are all 12" finished blocks and are really a variation on a theme. 

We have focused a lot on the precision method of piecing. TODAY we are going to talk about Half Square Triangle Paper cheats. 

My favorite Triangle Paper is produced by Quiltime. (Of course we carry them at the shop!)


If you have never used Triangle Paper. It is thin paper with pre-printed stitch and cut lines for specific finished sizes of half (or quarter) square triangles. It it easier to use the paper if you are making a bunch of half square triangles with the same fabric combination than it is to draw lines with the handy dandy Quick Quarter on individual squares. 

For a quick tutorial on the basics - a special thank you to Quiltime for this great tutorial with illustrations: 

STEP 1 - Layer and Pin (or Spray Baste with 505)
First cut pieces of fabric to cover the area of the Triangle Paper triangles you wish to use (see below regarding cutting paper to size). Place fabric right sides together and place paper on top. Pin or Spray Baste to hold in place.


STEP 2 - Sew on Dashed Lines
Now, sew the paper and fabric together along all dashed lines to make the seams between the fabric triangles in each square.

I reduce my stitch length when I am sewing on Triangle Paper.


STEP 3 - Cut on Solid Lines
Now, cut the paper and fabric apart along all solid lines to get squares. For quarter square paper, cut on vertical lines, then the lower left to upper right diagonal lines.


STEP 4 - Tear Paper Away
Fold the paper back over the seam to perforate the paper, and tear gently up or out from the seam.

I often refer to the triangles with paper attached as "fortune cookies".


STEP 5 - Press and Trim
I added this step. After you have removed all of the papers, carefully press the squares open. Trim off tails to reduce bulk. 

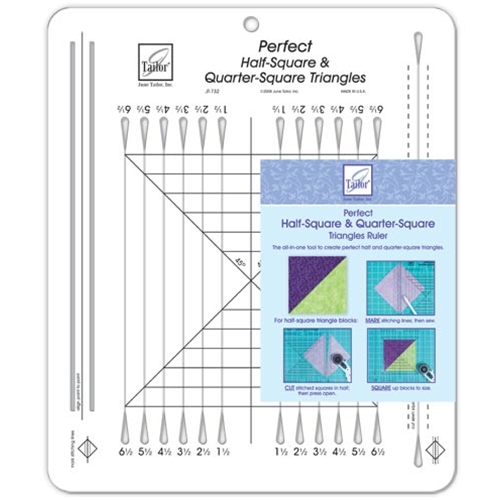
We find Triangle Paper to be incredibly accurate. If you picked the wrong size paper and need to square up or you simply just need a little help. We like the June Tailor - Perfect Half and Quarter Square ruler to help squaring up. 


A Tip to Conserve Unused Triangle Paper
Cut the paper apart along solid lines (vertical solid lines for the quarter square paper) to get the number of triangle squares needed for a given pair of fabrics for your project. Cut your fabric pieces to fit the remaining area with a little extra on the edges for insurance.


Okay, now that you know a little bit about triangle paper, let's talk about why this is important for these blocks. 

If you look at these three blocks, they can all be pieced with half square triangles instead of flying geese and half square triangles. 

You will need 3 sheets of 3" finished half square triangle paper. (or 1 sheet per block) 

A Quiltime 3" finished sheet will yield 16 squares. 


For Block #1, you would arrange like this:


For Block #12, you would arrange like this: 


For Block #18, you would arrange like this: 


Precision Piecing Tip: 

Now for those of you that do not wish to add all of this bulk to your blocks. If you make all three blocks with the same fabrics you can still use ONE sheet of triangle paper to make quick work of your squares! 

Now to finish getting ready for my Quilt Market trip! Stay tuned this weekend for really fun updates from Houston! 


Thursday, October 16, 2014

MODA Modern Building Blocks - Week 3 - Block 1


Block 1
36” Finished

We are working on Block #1 this week. I know it may be super scary, but we want to play with our fabrics. Since so many of you are choosing your own fabrics, we want to make sure you have enough fabric for the large pieces required. 

***If you are building your skills and this block seems too intimidating. Choose your fabrics, CUT the big chunks and set aside for later.***


Sub-units
1 – 12 ½” Square Block
4 – 9 ½” x 18 ½” Flying Geese

Method A (Pattern with half square triangle shortcut)
Fabric
What to cut?
Block Part
What to buy if making scrappy?
9900
230
8 – 3 7/8” Square

Keep 2 Squares WHOLE to pair with Block part D

Cut 6 in half diagonally once


B
Standard ¼ yard or Fat Eighth
9900 87
2 – 10 3/8” Square
Cut in half diagonally once
E


1/3 yard or Fat 1/6th (12” x 22”)
9900
109
4 – 9 7/8” Square
Cut in half diagonally once
F
1/3 yard
9900
37
1 – 19 1/4” Square
Cut in half diagonally twice

4 – 9 ½” Square

G


H
5/8 yard
9900 281
1 – 4 ¾” Square

1 – 7 ¼” Square
Cut in half diagonally twice

2 – 3 7/8” Square
Keep squares and pair with fabric for Half Square Triangle Units


A

C


D
Standard ¼ yard or Fat Eighth

Assembling Block:
·        Carefully “Square in a Square” your background “A” with 4 “B” triangles. 

I find that pinning the center point of the base of the triangle to the center point of the side of the block first helps align the pieces.


Align the centers and then pin for stitching. Repeat on all four sides. 


            Block should now measure 6 ½” x 6 ½”


·        Piece 4 flying geese measuring 3 ½” x 6 ½”  - use caution and pin on the bias


·        Piece 4 half square triangle units measuring 3 ½” x 3 ½” – hint: use the quick quarter ruler

·        Trim off excess threads and fabric tails all sub units. Press.


·        Construct center block as a 9 patch. 


·        Press. Block should measure 12 ½” x 12 ½” – if it does not – STOP!
Center medallion must equal this size to proceed.


·        Carefully “Square in a Square” your center block with 4 triangles. Build on the skills from earlier in the block! Be careful, the longer seam has greater tendency to stretch. PIN, PIN, PIN!


·        Block should now measure 18 ½” x 18 ½”


·        Create 4 large flying goose units measuring 9 ½” x 18 ½”


Pin generously when sewing on the bias.
Stitch slowly and use a stiletto or awl to prevent stretching the seam.
 Press up into the half square triangle of the “sky” in the goose unit to prevent stretching or distortion.
 Use Clearly Perfect Angles to improve your piecing accuracy.
 Complete block in a 9 patch fashion.


Block should measure 36 ½” square.
Trim off excess threads and fabric tails.
Press.

Remember to share your blocks on Facebook, Twitter, Instagram and Flickr! 

-------------------------------------------------

Method B (TRIANGLE PAPER FOR CENTER & CONNECTORS)

The center block may be constructed entirely from half square triangles. More on this topic in WEEK 4. :-) 

Fabric
What to cut?
Block Part
What to buy if making scrappy?
9900 230
1 – 8 x 16 Rectangle

B
Standard ¼ yard or Fat Eighth
9900 87
2 – 10 3/8” Square
Cut in half diagonally once
E


1/3 yard or Fat 1/6th (12” x 22”)
9900
109
8 – 9 1/2” Squares

F
5/8 yard
9900
37
4 – 9 ½” x 18 ½” Rectangles

4 – 9 ½” Square

G

H
7/8 yard
9900 281
1 – 8 x 16 Rectangle

A/C/D
Standard ¼ yard or Fat Eighth


Tips:
·        Use 1 sheet of Quiltime 3” Finished ½ square triangle paper to create 16 half square triangle units.  


·        Use 505 adhesive spray to adhere the triangle paper to the top fabric.
·        Shorten your stitch length when stitching on triangle paper to avoid your stitches coming undone when removing the paper.
·        When removing paper from triangle, finger press the paper back against the stitch line first to perforate the paper prior to tearing off.
·        Frequent pinning for even the most experienced quilter makes long bias seams easier.

Assembling Block:
·        Construct half square triangle units for center block using triangle paper method.
·        Arrange 16 blocks to appear in the same pattern as the center block.
·        Stitch together as a 16 patch (4 across x 4 down)
·        Center block should measure 12 ½” x 12 ½” – if it does not – STOP!
Center medallion must equal this size to proceed.
·        Trim off excess threads and fabric tails. Press.
·        Carefully “Square in a Square” your center block with 4 triangles. I find that pinning the center point of the base of the triangle to the center point of the side of the block first helps align the pieces for pinning then stitching.
·        Block should now measure 18 ½” x 18 ½”
·        Create 4 large flying goose units measuring 9 ½” x 18 ½” using the connector method used in Month #1.
·        Complete block in a 9 patch fashion. 

Wednesday, October 8, 2014

MODA Modern Building Blocks - Week 2 - Block 16


Block 16
12” Finished

Sub-units
2 – 6 ½” x 12 ½” Flying Geese

Method A (pattern)
Fabric
What to cut?
Block Part
What to buy if making scrappy?
#1
1 – 6 7/8” Square
Cut in half diagonally once
Use both halves
B
Standard ¼ yard or Fat Eighth
#2
1 – 13 ¼” Square
Cut in half diagonally twice
Use 1 quarter square triangle

1 – 6 7/8” Square
Cut in half diagonally once
Use both halves
A


D
Fat Quarter
#3
1 - 13 ¼” Square      
Cut in half diagonally twice
Use 1 quarter square triangle
C
Fat Quarter


Tips:
·        Use caution cutting a large square in half diagonally. I like to use the 45 degree line on my Big Daddy ruler for alignment.


·        Pin when sewing on the bias.


·        Stitch slowly and use a stiletto or awl to prevent stretching the seam.
·        Press up into the half square triangle of the “sky” in the goose unit to prevent stretching or distortion.
·        Use a quarter square triangle for the large triangle and a half square triangle for the small triangle to keep bias on the inside of the unit.
·        Try a SETTING Triangle from a 6 5/8” strip for quarter square triangles to conserve fabric!


·        Use Clearly Perfect Angles to improve your piecing accuracy.

Method B (Connector Corners)
Fabric
What to cut?
Block Part
What to buy if making scrappy?
#1
2 – 6 ½” Squares

B
Standard ¼ yard or Fat Eighth
#2
1 – 6 ½” x 12 ½” rectangle

2 – 6 ½” Squares

A

D
Standard ¼ yard
#3
1 – 6 ½” x 12 ½” rectangle

C
Standard ¼ yard or Fat Eighth


Tips:
·        Use a Quick Quarter ruler and a Sewline pencil to draw stitch line down the center slot of the ruler.


·        Use caution to avoid stretching your square as you draw stitch line.
·        Experiment trimming out only the middle layer of bulk as you to achieve perfect geese. The foundation rectangle is always your true alignment guide.
·        Connectors use more fabric in general. When making single blocks, connectors require less fabric be cut for main large triangle unit in flying goose. 
6 ½” x 12 ½” rectangle vs. 13 ¼” square


Assembling Block:
·        Piece 2 – flying geese units.
·        Each goose should measure 6 ½” x 12 ½” – if it does not EVALUATE
·        Combine geese to complete block.
·        Pin and use caution to avoid cutting of the point of the goose.

Block should measure 12 ½” square.

Trim off excess threads and fabric tails. 


Remember to share your blocks on Facebook, Twitter, Instagram and Flickr!